Once again, Di-O-Matic tools are used by
an Oscar-nominated studio to bring amazing CG characters to life. We had a
unique opportunity to sit down with
Luis San Juan, character rigger
extraordinaire. In the following pages Luis reveals in details his take on
facial rigging techniques and share with us the character animation pipeline used at Nexus
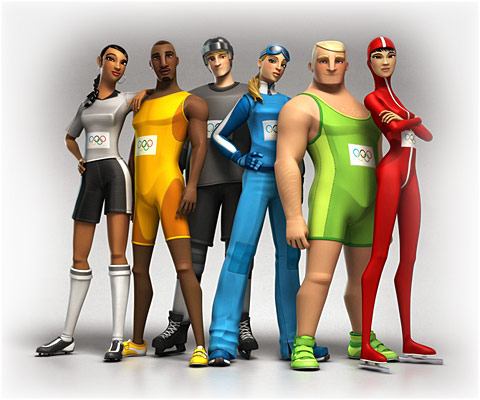
Productions for their latest commercial for the International Olympic committee: All Together Now.
As an accomplished
freelancer, could you tell us about the different studios that have employed
you in recent years?
Luis: I have been freelancing for the most part
of my professional career. Working as a 3d artist for the past 9 years, I did
start with a more generic position doing modeling, lighting, texturing and
rigging, a bit of everything really. Quickly though I put my focus on my Character
TD role which brought me, last years, to creating Pipelines and custom tools. Amongst
the important studios I have worked for in my career are Nexus Productions, Keytoon Animation studios and Ilion Animation studios.
Nexus Productions, was
quite challenging but had a great working environment. The amount of CG artists
working on commercials varies quite a lot depending on the projects. I have
worked there the longest in my career and the great thing about Nexus is you
end up working with lots of different directors with different styles.
Keytoon is a nice studio in my home
town of Valencia, Spain, where I had a great time. Most of the projects when I
worked there were for the Unites States and always put great focus on characters
from design, modeling, rigging to animation. Keytoon
has a really talented crew; you always feel part of the team.
Facial mask rig in action at Keytoon.
Ilion
is the company behind
Planet51.
I worked there for 6 months, during the preproduction stages of the movie, working on the rig
system for bipedal characters and the facial animation system that was used on
the feature. I had a great time working in a feature film environment, quite
different from commercials. It opened my eyes to a different way of approaching
a production and to the importance of a good pipeline. During that time Juan
Solis was the Character Development Supervisor and we worked together for the
prototype of the facial animation setup, Juan introduce me to a plugin he had come across working at
Blur Studio named Morph-O-Matic, I loved the tool and since then used it in various projects
throughout my career.
Autodesk: exclusive behind the scene look at Planet 51.
As of January 2010, I have been working at
The Mill, in London, where a couple of very interesting projects are in the
works, and I am enjoying my new working environment using Softimage and Maya.
International Olympic Committee: All Together Now
As a rigger you are
always faced with a number of challenges, how would you describe your
experience with the production of the International Olympic Committee: All
Together Now ?
Luis: The IOC’s "All Together Now" was
an interesting project. Directed by
FX & Matt
and created at Nexus Productions.
I supervised the character setup and worked a lot with the modelers
David Fleet and
Andrew Hickinbottom to get a good topology for the bodies and the faces.
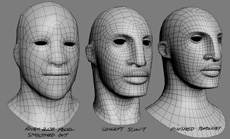 |
Good topology and the correct deformations were
fundamental to achieving the results we needed.
Typically we will model a few key facial morphs to
make sure we can obtain the desired face pose then, if we are happy with
the pose, we will later elaborate a more complex facial rig for this
pose is to make sure the character is going towards the right direction. These key face poses are usually; a frown, a big smile or an O shape
trying to put a face in the most extreme poses and making sure it will behave
nicely. Once this is achieved we move on to rigging. |
Since this project was on a tight schedule,
we had to develop the character rig in stages, each character went through
several versions as we where; tweaking the skin, adding controls, improving facial
animation, So we needed an initial rig early on to start working as soon as
possible and we will keep making new versions as the project progresses. To update
each character rig efficiently custom
tools were developed for us and allowed us to update the rigs and load the
animations each time very quickly.
Behind the scenes: All Together Now
We started focusing on the body rig of the
main character, for the body rig we used one of
Brad Noble’s rigs, Brad used to work for Nexus
productions, and he starting developing his rig system when he was working for Nexus, later he went
back to Australia where he continued with his rig project .We have collaborated
together frequently in recent years. His rig is a really complete cartoon rig
that suited the job perfectly. On top of the rig we run our own script to make
changes and to make the rig work with the tools and pipeline of the studio.
We used another tool,
created by Matt Clark one of our fellow
freelancers at Nexus, which allowed a good fast automatic skinning for a starting
animation and proxy version of the mesh. (Sliced mesh linked to the rig for
having a quick frame rate). The skinning was improved later and we used skin
morph to model correction shapes where we needed in the models, mainly hips, elbows,
knees and wrists.
Later we focused on
facial rigs. I prefer a nice UI that makes animating easier, so the UI we used
was a mask to select controls for the eye brows, the jaw, lips, lip corners and
animate them as you would move them in reality. So if you grab a lip
corner and move it on the side it will move the corner of the mouth to the
side. I like each icon to be quite graphic so the user is not confused with what
he is grabbing.
|
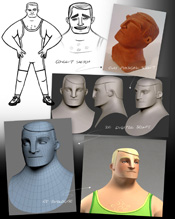 |
We don't model morphs
for expressions or phonemes, we model each morph to move a certain area of the
face, normally imitating the movements of the muscles. And for certain areas including
eye brows and lids or lips we have a main control to animate that area and
micro-controls to be able to change the shapes of the area.
To work quickly we had
a naming convention for the morphs that allowed us to connect them directly to
the UI, connecting each area separately. So we could focus on desired areas, or
keep adding more morphs to the rig in stages, particularly in this commercial we
focused on the eyes and brows area first, because a few shots where showing only
that part of the face, then later we added more morphs for the rest of the
face.
|
Apart from the normal rigging, the
commercial is full of ropes which the characters are interacting with, sometimes
more than one character at a time. So I developed an automatic rig for ropes
and the animators where able to create and customize the ropes they needed for
each shot without the help of modellers or riggers. This was vital if we wanted
to get the job done in time.
We also used a custom tool for constraints,
since the characters grab and drop ropes all the time, they even grab each
others.
This custom constrain could be saved and
reloaded every time the character was changed. The tool was very easy to use
and allows re-timing and key frame editions by the animators. For the last year it has become the
standard for constraining at Nexus.
Your facial rigging
technique is very graphic but not what we could call very common. What are the
advantages of your mask rigging technique?
Luis: I prefer a nice UI that makes animating
easier, the mask is quite graphic and is obvious as to what each control does.We
have controls for each part of the face, jaw, lips corner of the mouth, cheeks,
eye bag, eyes, eyebrow...
Each control can be
moved, rotated, moved and rotated or even scaled! This translates directly on
the face mesh, so the relationship between the mask and the face is very fluid
and animators feel comfortable with that.
If you grab one of
the lip corners and move it on the left it will move the corresponding corner
of the mouth to the left. I like each control to be graphically self
explanatory so no one is confused with what they are manipulating. I am keener
on using this kind of UI as opposed to a long list of parameters.
All Together Now: Facial mask rig in action.
A main control is
assigned for each area. With it you can move and rotate large sections of
morphs and create poses, then you can use the micro controls and add more detail
to them, to give the subtlety that is so important in animation.
If you want to bring
your expressions to the limit, most of the time you will want to mix a few
morphs together driven by the controllers. This will create problems in the
mesh, intersection, pinches...etc. This lead us to create a third morph to fixes
the problem. This third morph is what I call a Binomial morph; it launches itself
without having to be animated and can react to the values of two or more
controllers. A complex rig will have a lot of binomials but thanks to its auto-launching
nature, animators concentrate on creating good poses with no interruption.
For the modelers or
Character TD working with face rigs, a naming convention was created for the morphs,
which allowed us to connect them directly to the UI.
The UI is driven by
connections; you can connect each area separately. This allows us to focus on
certain areas specifically, and add morphs depending on each characters needs. Fully
developing a complex facial rig for each character would mean a lot of time
spent on something that can change at any minute, so scalability is the key to the
efficiency of our UI.
In today’s CG industry where production schedules
keep getting shorter. How important was the efficiency of the pipeline and choice
of team mates for this production?
Luis: This partcular job was set on a tight schedule, so we had to plan
it very carefully. The total time frame was around 12 weeks, from planning and
design to the complete movie. I was quite involved in the setup of the pipeline,
it was setup in a way where models and characters where XREF objects, so an artist could change a model in one file only and it would get updated
in each scene that used the character. This kind of time saving was essential. The pipeline was included the following tools: Zbrush,
3ds max, Vray, Morph-O-Matic,
Photoshop, After Effects and Adobe Premiere.
For this job we needed
a team of all rounders, two character modellers, two
lighters, two animators, two environment modellers and texture artists, two comp'ers, 2 riggers including me and another rigger to help
for a few days, at the peek of the job.
I was fortunate enough to work with some
truly amazing artists including David Fleet, Andrew Hickinbottom,
Michal Firkowski, Patrick Kraft, Nico Domerego, Jose Maria Andres Martin, Melanie Climent, James Wilson and Eoin Coughlan.
How many characters did you rig?
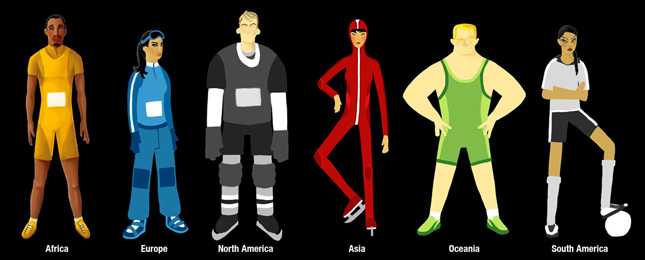
Luis: Well, there where 6 main
characters and 12 background characters with less resolution as the crowds and
to interact with the backgrounds. Apart from that there where also animals like
bison, camels, birds, and vehicles to rig!
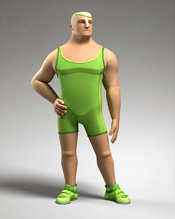
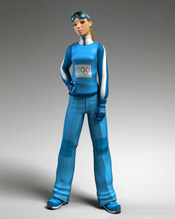
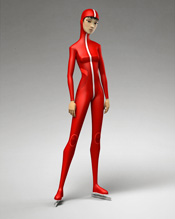
Each of them went through
different versions. We started with an initial rig, a quick skin and proxy mesh
for the initial animation; we updated each of them to a better version with a
good skinning and skin morph to achieve a nice deformation. Later we got more
versions with facial animation masks and we kept updating them with more face
controls or new morph as the shots will needed.
So the main characters
went through at least 4 revisions each, give or take one or two more depending
on changes by the animators.
What role did Morph-O-Matic
play in your production?
Luis: At Nexus we
systematically use
Morph-O-Matic for productions
requiring facial animations such as several campaigns for Coca-cola and
Electronic Arts: The Sims 3. Morph-O-Matic allowed us
to achieve the quality we needed for the facial animations while focusing on
the artistic part of it. We used it because of all its advantages over morpher. It is always important to be able to customize
your tools to match different productions. Its connection with maxscript enables us to do that in spades.
|
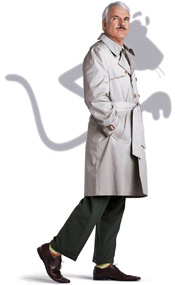
I have also used
Hercules
on other jobs for Nexus Productions, probably one of the most important,
was a title sequence for the Pink Panther movie
staring Steve Martin which features Pink Panther in 3D for the
first time.
|
 |
The difficulty with that
particular project was that we needed to keep the volume and have jiggle
on the muscles in a few shots.
Animated Pink Panther title sequence |
The reason why I used
Morph-O-Matic is because it allowed us to focus on
the artistic side of the job and not worry about the technical aspect of the
job. Morph-O-Matic has the advantage of higher speed
for the animators, and for the riggers it has all the option you would normally
need plus the ones you always wished morpher had.
It can extract all
the morphs back to the scene, even the progressive ones. This gives you the
freedom to delete targets and recover them only when needed, which keeps the
setup scenes very light. This lets you to come back to edit a specific Morph
Target if needed.
Morph-O-Matic can have progressive morphs in positive and negative
values. That is very helpful, imagine a morph that can control the jaw moving
up and down, to achieve this in morpher you have to
use two morphs and build expressions in the wiring. In Morph-O-Matic you have this by default.
Apart from other
features, the access to Maxscript is much more
powerful and allows you to create custom tools more efficiently. As a TD I
always want to have total control of automated tasks.
I want to use
Morph-O-Matic on every job with a complex facial
animation and I have recommended it to every company I have worked for.
Many Technical Directors like to have
control over the plug-ins they implement in the pipeline, and a lot of them
want to develop codes to implement the tools they need. Most of them don’t rely
on 3rd parties. I am always proactive in the development of new
solutions, but I firstly look for commercial software that can do the job and evaluate
their strength and weaknesses. I prefer to develop tools that are not available
but are important to the pipeline. Normally if I choose a 3rd party
software for my pipeline, I make sure they have great technical support and are
keen to changes, being part of the beta testing always helps.
In the case of Di-O-Matic’s
Morph-O-Matic; it is simply a great tool with
everything I need and more, creating my
own one would take weeks and I would rather spend my time making other tools we
need instead.
What can you tell us about the
implementation of Morph-O-Matic in your pipeline?
Luis: There is almost no learning
curve in Morph-O-Matic, I watched the tutorials
videos and had a quick chat with another freelancer whom had used it before and
that was enough to understand it. Most of the freelancers and animators I have
worked with got really comfortable with it the first day they used it.
The help file for maxscript is well documented and allowed us to fit Morph-O-Matic in our pipeline very easily as we always have to customize
our tools for different jobs. Apart from that, I
have to say the staff at Di-O-Matic, are always great with support, they listened
to what we needed and delivered it.
Di-O-Matic products are
really efficient tools that allow us to focus on the artistic side and not the
technical side. Morph-O-Matic has all the option you
would expect from a morph-based solution but allows a lot more freedom. Every
job I work with complex facial animation I use Morph-O-Matic
and I would recommend it to any company.
Di-O-Matic would like to thank
Nexus Productions for
granting permission to do this interview and consenting to share so much behind-the-scene
information! For more information on Nexus Productions
please contact
jobs@nexusproductions.com
Pages: 1
2
3
4
5
6
|